Mylar bags are versatile and popular in various industries for their durability, moisture resistance, and ability to preserve the freshness of products. Whether you are a business owner looking to create custom packaging or an individual seeking to personalize gifts or storage solutions, printing on Mylar bags can elevate your brand or add a personal touch. In this comprehensive guide, we’ll walk you through the step-by-step process of printing on Mylar bags using different methods, ensuring your final product looks professional and stands out.
Choose the Right Mylar Bags
Selecting the appropriate Mylar bags for your printing project is crucial. Consider the bag size, thickness, and closure type based on your specific requirements. Mylar bags are available in various shapes and sizes, allowing you to tailor them to your needs.
Design Your Artwork
Before you start printing, create or procure the artwork you wish to display on the Mylar bags. Use graphic design software to design your logo, brand name, product information, or any other visuals that reflect your desired message.
Printing Methods
Heat Transfer Printing
Products and Equipment Used
- Forever Laser Dark Transfer Paper
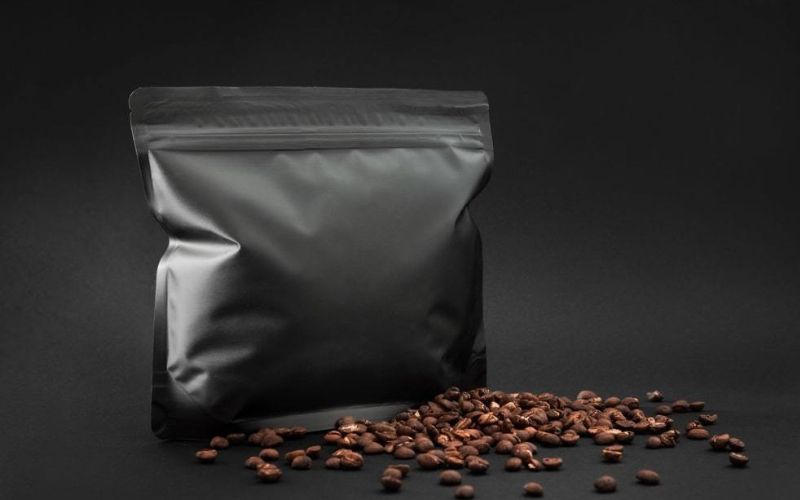
- Mylar bags (black kind)
- Printer (such as 9541 or any DigitalHeat FX printer)
- Computer with design software (e.g., Print Optimizer)
- Heat press capable of reaching 310 degrees Fahrenheit and 200 degrees Fahrenheit
- Parchment paper for protecting the Mylar bags during the application process.
Step 1: Prepare Your Designs
- Load your designs into print optimizer software. Ensure that the designs are appropriately sized to fit on the Mylar bags. In the demonstration, three designs were fitted on a single sheet.
Step 2: Print Using Forever Laser Dark Transfer Paper
- Use a compatible printer, such as the 9541 or any DigitalHeat FX printer, to print your designs onto Forever Laser Dark Transfer Paper.
Step 3: Prepare the Heat Press
- Set your heat press to 310 degrees Fahrenheit (or follow the specific temperature guidelines provided with the transfer paper) and preheat it for 120 seconds.
Step 4: Apply the Transfer Paper to the Mylar Bag
- Place the printed transfer paper onto the Mylar bag, ensuring that the toner side is facing the bag’s surface.
Step 5: Heat Press Application
- Press the Mylar bag and transfer paper using the preheated heat press for the specified time (120 seconds in this case). The heat and pressure will transfer the toner from the paper onto the Mylar bag, bonding it with glue.
Step 6: Peel the Transfer Paper
- Once the application time is completed, immediately peel off the transfer paper from the Mylar bag. Do this in a slow, fluid motion while keeping your hand as low as possible and the paper on the platen.
Step 7: Marry All Papers
- If you have multiple Mylar bags to print, marry all of your paper first before proceeding. Lower the heat press temperature to 200 degrees Fahrenheit and allow the press to cool down while planning for the next step.
Step 8: Trim and Apply
- Trim the printed Mylar bags as needed to remove any excess paper. Then, position them on the heat press platen, cover with parchment paper, and apply pressure for a quick ten-second press.
Step 9: Let the Mylar Bags Cool
- Allow the Mylar bags to cool down completely after the pressing process is finished. This will ensure the transfer adheres properly to the bags.
Step 10: Optional Finishing Press
- If you prefer a matte finish instead of a glossy one, you can do a finishing press. Put the printed Mylar bags back into the heat press, cover them with parchment paper, and apply pressure for five to ten seconds at the lower temperature (200 degrees Fahrenheit).
Step 11: Enjoy Your Finished Mylar Bags
- Once the Mylar bags have cooled down, you can enjoy the beautifully printed designs. The process provides durable and attractive prints on the black Mylar bags.
Print on Mylar bags with Stickers
Equipment and Products Used in the Process
- DigitalHeat FX 9541 Printer (or any DigitalHeat FX printer)
- Print Optimizer Software
- Laser-approved label or sticker paper (purchased from onlinelabels.com or other suppliers)
Step 1: Prepare Designs and Software Settings
- Load your custom designs into the Print Optimizer software. Make sure the paper size is set to 11 by 17 inches. In the color layer, turn off the white option. Under printer options, select the media type as “labels,” and ensure the mirror option is turned off as you’ll be printing in non-mirror.
Step 2: Print the Designs
- Load the label or sticker paper into the printer’s tray. Print the designs onto the label paper using your DigitalHeat FX printer. You can have multiple sheets of paper in the tray if needed.
Step 3: Cut Out the Stickers
- After printing, cut out the printed designs using scissors. If the design is intricate, you can use crop marks and a cutter (e.g., Graphtec) that reads the crop marks for precise cutting.
Step 4: Apply the Stickers to Mylar Bags
- Take the Mylar bags and peel off the backing from the sticker. Position the sticker on the bag, starting from one end and carefully aligning it as you go to avoid bubbles and misalignment. For ease, it’s recommended to start with the bottom of the bag.
Step 5: Finishing Touches
- Smooth out the sticker on the Mylar bag to ensure it adheres properly. Ensure there are no bubbles or creases. The sticker application process is quick and easy, providing you with a customized Mylar bag.
Step 6: Optional Printer Choice
- The process demonstrated uses the DigitalHeat FX 9541 printer for vibrant colors with the fifth color option. However, this method can be employed with any of the DigitalHeat FX printers, depending on your color preferences and equipment availability.
This method allows you to create custom Mylar bags with sticker labels efficiently and cost-effectively. The ability to use various label shapes and designs opens up possibilities for unique branding and packaging options. By using label paper and an in-house printer, you gain the flexibility to meet customer demands, quickly change designs, and produce short runs without the need for large minimum orders from external suppliers.
Important Tips For Mass Production
- Test Before Mass Production Before proceeding with large-scale printing, conduct test prints on a few Mylar bags to ensure color accuracy, alignment, and overall quality. This step helps identify any issues and allows for adjustments to be made before full production.
- Print and Apply Once you are satisfied with the test prints, proceed with printing the entire batch of Mylar bags. Follow the steps according to your chosen printing method and apply the designs to the bags accurately and neatly.
- Finishing Touches Consider additional finishing touches, such as laminating the printed Mylar bags to enhance their appearance and protect the design from external factors like moisture or abrasion. Matte or glossy lamination options can give the bags a premium look.
Conclusion
Printing on Mylar bags offers endless possibilities for businesses and individuals alike. By following the steps outlined in this guide and selecting the most suitable printing method for your project, you can create eye-catching, personalized, and professional-quality packaging. Whether it’s for product branding, marketing, or gifting, custom-printed Mylar bags can leave a lasting impression on your customers or recipients. Remember to invest in high-quality materials and equipment for the best results, and don’t forget to unleash your creativity to make your printed Mylar bags truly stand out. Happy printing!